I tackled details of integration, documentation creation as well as exposition of documentation using Swagger and its module Swagger UI. One of obvious shortcomings that might be serious concern for people managing their API documentation is fine-grained control over what is published and what stays hidden. There are several reasons to decide to hide something from users. First might be the lack of relevance of introspected information that just don’t belong to the documentation. Other big issue might be security concerns as well as the design of API documentation itself.
Creating model restrictions
One big area of finer configuration of your documentation is hands-on manipulation with the model and its properties (to brush up on this topic check out chapter Creating model documentation from my previous post Spring Rest API with Swagger – Creating documentation). An example of this situation can be seen in User API model. In my example, I want to return all the user details except users avatar in method getUser (leaving space for a dedicated methods for avatar manipulation). To reflect this requirement there are several ways you can go:
@JsonIgnore- JSON support allows for model conversion based on application of
@JsonIgnoreannotation.
- JSON support allows for model conversion based on application of
@XmlTransient- XML support allows for model conversion based on application of
@XmlTransientannotation.
- XML support allows for model conversion based on application of
- Explicit model conversion
- In case that none of the above is an option for you there is one thing you can do – convert your model manually. In order to do this you will need to provide and register your own implementation of
SwaggerSchemaConverter.
- In case that none of the above is an option for you there is one thing you can do – convert your model manually. In order to do this you will need to provide and register your own implementation of
For the purposes of this example I decided to modify User and Product classes and add property to be hidden from API documentation. This will show how to alter the documentation both for XML and JSON. Following is code sample used in both classes.
private final String oneToBeHidden = "hiddenOne";

public String getOneToBeHidden() {
    return oneToBeHidden;
}
Based on my observation, Swaggers introspection picks up model properties based on getter method syntax (so you don’t even need to declare class member and its enough to comply to getter naming convention). Given this setup Swagger produces following model schema for User class:
{
  "users": [
    {
      "oneToBeHidden": "",
      "userName": "",
      "firstName": "",
      "surname": "",
      "email": "",
      "lastUpdated": ""
    }
  ],
  "count": 0
}
To achieve model alteration you will need to declare oneToBeHidden as a model property and define your own access modifier. This might seem like a contradictory move, but Swagger will locate oneToBeHidden property getter method in both classes and add a new property to the model regardless. This way you can define access modifier that will be used later on in SwaggerSchemaConverter. For this example, I decided to go with ‘hidden’ (but as you will see naming depends on you).
@ApiModelProperty(access = "hidden")
public String getOneToBeHidden() {
    return oneToBeHidden;
}
Next step is to provide your own SwaggerSchemaConverter implementation. Following is a simple implementation of this type of converter.
package com.jakubstas.swagger.rest.config;

/**
 * API model schema filter to enable hiding of API model attributes.
 */
public class AccessHiddenModelConverter extends SwaggerSchemaConverter {

    private final Logger log = LoggerFactory.getLogger(AccessHiddenModelConverter.class);

    @Override
    public Option<Model> read(final Class<?> modelClass, final Map<String, String> typeMap) {
        final Option<Model> modelOption = super.read(modelClass, typeMap);

        Class<?> currentClass = modelClass;

        while (currentClass.getSuperclass() != null) {
            for (final Method method : modelClass.getDeclaredMethods()) {
                if (method.isAnnotationPresent(ApiModelProperty.class) && isAccessHidden(method)) {
                    hideModelProperty(currentClass, method, modelOption);
                }
            }
            currentClass = currentClass.getSuperclass();
        }
        return modelOption;
    }

    private boolean isAccessHidden(final Method method) {
        if (!method.getAnnotation(ApiModelProperty.class).access().isEmpty()) {
            return method.getAnnotation(ApiModelProperty.class).access().equals("hidden");
        }

        return false;
    }

    private void hideModelProperty(final Class<?> currentClass, final Method method, final Option<Model> modelOption) {
        final String propertyName;

        if (method.isAnnotationPresent(XmlElement.class) && !method.getAnnotation(XmlElement.class).name().isEmpty()) {
            propertyName = method.getAnnotation(XmlElement.class).name();
        } else {
            propertyName = getClassMemberName(currentClass, method);
        }

        if (StringUtils.hasText(propertyName)) {
            modelOption.get().properties().remove(propertyName);
            log.debug("Successfully hidden API model property '" + propertyName + "'");
        }
    }

    private String getClassMemberName(final Class<?> currentClass, final Method method) {
        try {
            for (PropertyDescriptor propertyDescriptor : Introspector.getBeanInfo(currentClass).getPropertyDescriptors()) {
                if (propertyDescriptor.getReadMethod().getName().equals(method.getName())) {
                    return propertyDescriptor.getName();
                }
            }
        } catch (IntrospectionException e) {
            log.error("Unable to retrieve field name", e);
        }

        return null;
    }
}
Last thing we need to do is to make Swagger aware of our custom converter by adding it as follows:
ModelConverters.addConverter(new AccessHiddenModelConverter(), true);
After completing all these steps you should arrive at final model with desired modification:
{
  "users": [
    {
      "userName": "",
      "firstName": "",
      "surname": "",
      "email": "",
      "lastUpdated": ""
    }
  ],
  "count": 0
}
Creating specification restrictions
Other area worth exploring describes process of modification of published specification (to brush up on this topic check out chapter Operations documentation from my previous post Spring Rest API with Swagger – Creating documentation). One of the basic use-cases for this type of tuning is typically connected with the use InputStream for upload or when using injection on method parameter list level. Example of such a situation is avatar update method on UsersEndpoint from my example application.
Let’s walk through this example in steps. First step is to create documentation for said method. This is pretty standard documentation work, however it is required to use one annotation that I haven’t mentioned so far – @ApiImplicitParam. This annotation is a value of @ApiImplicitParams wrapper. To get better understanding of this annotation you can check out following documentation.
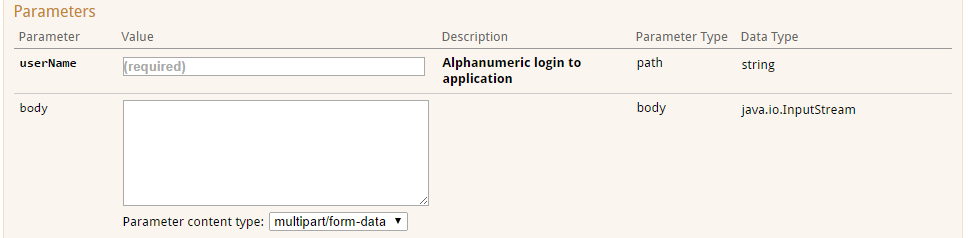
One might ask why do I need this annotation in first place. That’s a good question so let’s take a look at how our method documentation looks when we don’t use it. This situation is depicted in the picture below. As you can see there is no file upload button only a text area element to supply your data. This is quite impractical and makes the interactive part of API documentation rather unusable.
So based on that you need to use this annotation to enable Swagger UI to render file upload component as well as to provide desired functionality. Following code is an example of how to correct this issue.
/**
 * Updates users avatar.
 */
@PUT
@Path("/{userName}/avatar")
@Consumes(MediaType.MULTIPART_FORM_DATA)
@ApiImplicitParams(@ApiImplicitParam(dataType = "file", name = "avatar", paramType = "body"))
@ApiOperation(value = "Updates users avatar", notes = "Provides means to upload new versions of avatar based on username")
@ApiResponses(value = {
            @ApiResponse(code = 200, message = "Successful retrieval of users avatar", response = User.class),
            @ApiResponse(code = 404, message = "User with given username does not exist"),
            @ApiResponse(code = 500, message = "Internal server error") })
public Response updateUsersAvatar(@ApiParam(name = "userName", value = "Alphanumeric login to application", required = true) @PathParam("userName") String userName,
        @FormDataParam("avatar") InputStream avatarInputStream) {
    ...
}
However, if you look at your documentation now it contains one extra field you saw earlier. This is caused by the way introspection works and because avatarInputStream makes it all the way to the specification model. To prevent this we need to do two things – mark the property hidden and create and register filter to remove it from specification.
First part is fairly easy and all you need to do is to mark the InputStream as API param and define hidden access modifier. Updated example of this is shown below.
/**
 * Updates users avatar.
 */
@PUT
@Path("/{userName}/avatar")
@Consumes(MediaType.MULTIPART_FORM_DATA)
@ApiImplicitParams(@ApiImplicitParam(dataType = "file", name = "avatar", paramType = "body"))
@ApiOperation(value = "Updates users avatar", notes = "Provides means to upload new versions of avatar based on username")
@ApiResponses(value = {
            @ApiResponse(code = 200, message = "Successful retrieval of users avatar", response = User.class),
            @ApiResponse(code = 404, message = "User with given username does not exist"),
            @ApiResponse(code = 500, message = "Internal server error") })
public Response updateUsersAvatar(@ApiParam(name = "userName", value = "Alphanumeric login to application", required = true) @PathParam("userName") String userName,
        @ApiParam(access = "hidden") @FormDataParam("avatar") InputStream avatarInputStream) {
    ...
}
Second part is to create custom implementation of com.wordnik.swagger.core.filter.SwaggerSpecFilter. Specification filters allow us to filter which operations and parameters are displayed and allow for custom modification. Following implementation is an example of simple specification filtering for parameter hiding.
package com.jakubstas.swagger.rest.config;

/**
 * Specification filter to enable hiding of API parameters.
 */
public class AccessHiddenSpecFilter implements SwaggerSpecFilter {

    @Override
    public boolean isOperationAllowed(Operation arg0, ApiDescription arg1, Map<String, List<String>> arg2, Map<String, String> arg3, Map<String, List<String>> arg4) {
        return true;
    }

    @Override
    public boolean isParamAllowed(Parameter param, Operation operation, ApiDescription desc, Map<String, List<String>> arg3, Map<String, String> arg4, Map<String, List<String>> arg5) {
        final String paramAccess = param.paramAccess().toString();

        return !paramAccess.equalsIgnoreCase("Some(hidden)");
    }
}
Final step is to register your specification filter with following one-liner that can be found in SwaggerConfiguration in my demo application.
FilterFactory.setFilter(new AccessHiddenSpecFilter());
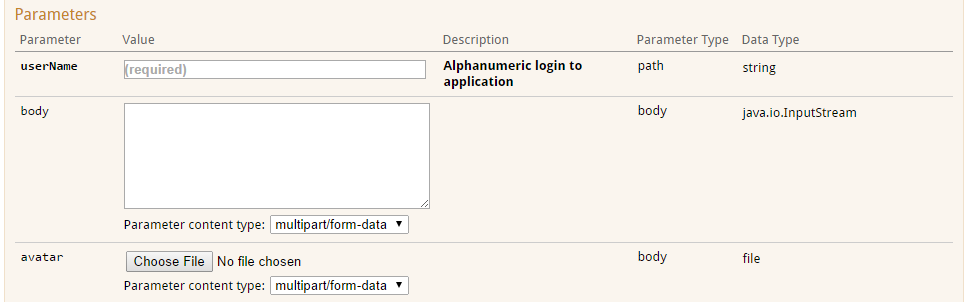
If you followed all these steps correctly, you should be able to see expected results just like depicted below.

What is next?
If you followed all steps you should now be able to create and publish documentation using Swagger. There are many other things I didn’t discuss in this micro series like other components, maven plugin or securing your documentation and APIs. I encourage you not to stop here and continue exploring. Consider this as a starting point and take your documentation to the next level. The code used in this micro series is published on GitHub and provides examples for all discussed features and tools. Please enjoy! 🙂
Update 06.04.2015: Since some users reported issues with updating the dependencies used in my example project I decided to create a second project for Spring 4 to provide distinct solutions for both Spring 3 and Spring 4.

Hi , I am using @ApiParam(access = “hidden”) and have implemented the filter for hiding the parameters . Even on setting the below config FilterFactory.setFilter(new AccessHiddenSpecFilter()); , this is not working for me.
I am not using JAX-RS 1.x/2.x for my project . Will this Annotation work without JAX-RS ?
If yes how ?
Thanks for you help in advance .I must add this is a great article.
Hi Amit,
first of all, thank you. I think it really depends on the framework you have used and the way Spring (and in my case also Jersey) picks up applications and Swaggers components. If you are using Spring MVC then you should check out Swagger Spring MVC (https://github.com/martypitt/swagger-springmvc) – there might be some support for this.
Hi Jakub,
Your article is definitely helpful. I was wondering if you could advise how I could apply this if I am using swagger spring MVC. In my swagger config I am using this. Take note that the
AccessHiddenModelConverterandAccessHiddenSpecFilterare the same ones you featured in this article. I then annotated the getter method in my model with@ApiModelProperty(access = "hidden"), but for some reason it is still showing in the JSON.Is there a different way to adding the model converters and filters when it comes to swagger-spring-mvc ?
Hi John,
what are you trying to achieve? If you are trying to just hide some stuff then consider other options. To quote dilipkrish from How do I ignore APIs with swagger-springmvc? from GitHubs issue:
Hi Jakub,
I guess I did not make the objective clear. I have a response object where I only need to filter out certain fields. The problem is that these fields require the use of
@JsonView(Something.class)because they need to be converted into json for use by the application UI. However, our QA does not want to see these specific fields in the Swagger UI. So I cannot use@JsonIgnorefor these fields because, although they will not be included in Swagger, the application UI needs the json.So I guess my goal is to use your example filter to exclude the json of certain fields only for the swagger UI even though they should be available to every other part of the application.
Sorry dude … I just got thrown into this huge project so I have no say on the architecture. I get what you mean and if I had to start over I’m sure the API’s can be redesigned but for now it’s what I’m allowed to work with.
Lastly,
it appears DocumentationTransformer is no longer included in the swagger-springmvc-0.9.5 jar file. What resources has this been moved to?
Unable to display the response model in the response messages section of Swagger API using SwaggerSpringMvcPlugin.please let me know if anyone knows on how to resolve this issue.As,I am using swagger 1.0.2 version..
I am using spring boot with mangofactory version 0.9.3 and wordnik 1.3.11. I am using Spring @ModelAttribute for the GET request POJO. I have a couple of problems
1. I added annotation for one simple property to have a list of possible values. Well the property shows twice, once, the default rendered internally, and then the one I put with ApiImplicitParam
2. I have embedded properties in my GET request, e.g. address.building.name.
For the properties that are nested, they are shown on the swagger page,to have the last two components of my embedded property, i.,e., building.name.
I use @ApiImplicitParam, and was able to add the property with the full name, but now I see both variants of the property, one with the full correct name (address.building.name), and the one rendered by swagger (building.name)
The second issue is more important to resolve for me, since nobody will be able to use the interface if not fixed. How do I get this mangofactory/worknik swagger to work properly for the embedded properties?
Hi Amapola, unfortunately I don’t have time to play with this setup right now and since I have no previous experience with this particular stack, I won’t be able to help.